E15 | Suburban Victorian | Getting Our Ducts in a Row
Season 47 Episode 15 | 23m 42sVideo has Closed Captions
HVAC subs are here to re-duct the house and make the system more efficient.
Richard Trethewey meets with the HVAC subs who are here to re-duct the house to make the system more efficient. Charlie Silva demos the third-floor ceiling to make room for new insulation. Meanwhile, Tom Silva and Kevin O'Connor install a double-hung window located in the dining room that looks onto the front porch. Back inside, Kevin and Charlie address a sloped floor in the parlor.
Problems playing video? | Closed Captioning Feedback
Problems playing video? | Closed Captioning Feedback
Funding for THIS OLD HOUSE is provided by The Home Depot and Renewal By Andersen.
Support provided by:

E15 | Suburban Victorian | Getting Our Ducts in a Row
Season 47 Episode 15 | 23m 42sVideo has Closed Captions
Richard Trethewey meets with the HVAC subs who are here to re-duct the house to make the system more efficient. Charlie Silva demos the third-floor ceiling to make room for new insulation. Meanwhile, Tom Silva and Kevin O'Connor install a double-hung window located in the dining room that looks onto the front porch. Back inside, Kevin and Charlie address a sloped floor in the parlor.
Problems playing video? | Closed Captioning Feedback
How to Watch This Old House
This Old House is available to stream on pbs.org and the free PBS App, available on iPhone, Apple TV, Android TV, Android smartphones, Amazon Fire TV, Amazon Fire Tablet, Roku, Samsung Smart TV, and Vizio.
Keep Exploring


This Old House Insider Newsletter
Get This Old House exclusive stories, tips, and behind-the-scenes information delivered right to your inbox every month.Providing Support for PBS.org
Learn Moreabout PBS online sponsorshipKevin: Today on "This Old House"... Richard: Even with our new addition, we're reusing the existing HVAC system, but we're adding some strategic ductwork.
Charlie: Then we're going to show you which insulation we're using on our roof system and why.
Tom: And we're getting back to the basics -- installing a new double-hung window into an existing opening.
♪♪ ♪♪ ♪♪ ♪♪ Kevin: Hey there.
I'm Kevin O'Connor, and welcome back to "This Old House," where we are working on a project right near downtown Needham, Massachusetts.
It was built in the late 1800s, originally about 3,000 square feet in total.
But now it is up to 3,600 square ft, thanks to a small addition off of the back that goes from the basement up to the second level.
All of the window openings are covered, but new windows are on their way and they should be in soon.
Let's have a look at the inside.
Through the front door you enter into what was the old parlor.
This room stays pretty much unchanged except for new wood floors throughout.
But then as you enter this part of the house, lots of changes.
So this was the old family room.
It's going to be the new dining room.
We're going to keep the original built-ins, and then we've got another built-in in this cavity, and we'll back up to a gas fireplace that goes into this cavity right here.
That's a nice touch because we get a fireplace, but it also allowed Charlie and Mark to take down the old one.
Look at all the real estate we picked up.
This is the outline of the old fireplace.
With that gone, we get a nice big wide entry to the main event.
What was the old dining room is now an expansive family room with the bay windows here that were original, but also more glass off the back of the house.
So the original house ends right there, and this is the addition that I was talking about, which gives us sliding glass doors out to a back deck, but also more interior space, so a proper back entryway into a mudroom with a half bath right there.
And because everyone loves the open floor plan, this big family room is now connected to what's going to be a new kitchen.
And that is thanks to a 24-foot I-beam that went in and allowed us to take down this wall right here.
So the layout will be we'll have the countertops and appliances back there.
Behind that wall will be a pantry, and then there's going to be a big island right in this space to connect kitchen to family room and to give us that big open floor plan.
Entryway down to the basement stays the same, and stairs to the second floor stay the same.
Like the first floor, our second floor is completely framed.
Let me give you a little lay of the land.
So, there's a new primary suite over here in this corner with some extra space thanks to that addition.
That gives us a new full bath out back.
Uh, and then Liz's closet goes right here.
Patrick's closet goes right there.
So that's nice.
The boys' bedrooms have been slightly reconfigured, and they're going to get a new shared full bath right here.
But in the primary bedroom, things stay pretty much the same?
Richard: Sort of.
Kevin: Oh, no.
Richard: A few minor changes.
So one thing I love about this project is, for the first time in a long time on our show, we are not ripping out and blowing up the entire HVAC system.
Kevin: Nice.
And how can we do that?
Richard: Well, it has a relatively new system installed, 10 or 15 years old.
It already has two zones.
It's really efficient.
Kevin: Nice.
Richard: And even though we're making the building slightly bigger, we're insulating and putting windows in so we don't need a larger size unit.
Kevin: Perfect.
Richard: So it does mean that we have a chance, though, to fix a few of the minor ductwork issues that might exist.
Kevin: Okay.
Richard: Alright.
One is right here in the primary.
Kevin: Yeah.
This is a weird spot.
I mean, right in the doorway and the only one?
Richard: Well, it wasn't weird when this house was first built.
Think about it.
It was a gravity system.
It would have been coal fired.
No fan, no electricity.
So the ductwork run would have been as straight as it could from the basement.
And then it came up, and it just filled this place.
There was no air conditioning even dreamed of back then.
But now as we're adding more load and we have a fan, now we have to think about when this thing comes on, now it could get actually pulled into the return and not go and fill this room.
Kevin: So originally okay, but with a system under pressure, no good.
Richard: That's right.
So it invited us to think about relocating it.
And we found some real estate on the lower floor so we could find a way to get a new supply right here... Kevin: Yeah?
Richard: ...and then another one right here where we're going to come up here.
So now you've got a much better air delivery system and abandon that one, okay?
Kevin: Very nice.
Richard: So too in the baby's room.
We found a similar situation.
You can see the original register right here where it really doesn't want to be, but perfect back in the old days.
So we found a way to actually come up below us and in a joist bay right here, end up with a new supply register exactly where it wants to be -- against the outside wall where the heat loss is and near the window, just like in the primary.
Kevin: Very nice.
Okay.
Richard: The HVAC subs are here, and they are underway.
So here in the first floor, Kevin, you can look up and see where the duct used to run.
And this thing came up here.
It was covered in asbestos, so we knew we had to modify it anyways.
And we also had all this chimney mass and that got changed.
Kevin: Although, back in the day, that's a pretty good place to run ductwork for a gravity system, right?
I mean, right next to the chimney.
Richard: Shortest distance between two points.
Kevin: Okay.
Richard: So with all this new massing here, though, we found a way that we could hide the ductwork.
Mike's underway right here running that new supply here in that corner up to the one side of that primary bedroom right there.
Kevin: So from the basement.
Kind of ironic that he's putting it next to our gas fireplace.
So similar idea to... Richard: And then James is working here in the corner.
Hey, James.
James: Hey, Richard.
How are you?
Richard: So you're hiding it in the corner?
James: Yeah, so Charlie's guys cut us a chase up in the bookcase to get the duct up to the second floor for us.
Kevin: Okay.
James: So we have three options of ducts here.
We can go round, oval, or rectangular.
Kevin: Rectangle.
Obviously.
It's going to fit better.
James: Most people would choose the oval or the rectangular to save on space, but the correct is actually the round.
This is going to give us the best airflow for the performance upstairs, heating and cooling, everything.
The oval is actually about a 20% to 25% airflow restriction compared to the round.
Kevin: No, no, no, no, no.
If I squeeze this and make it an oval, they're the same pipe.
Richard: If I squeeze a hose, a garden hose, I'm not really changing the inside diameter, but I am providing some restriction and more friction.
And that's exactly what happens here.
Kevin: So shape matters?
James: Exactly.
Yep.
Kevin: I would just figure it was like a volume thing.
James: And then this rectangular wall stack, this is about a 40% less airflow.
Richard: So there's a chance you might need two of these to get the equivalent of this.
Kevin: When I look at those two next to each other, it's inconceivable to think that that delivers less air than this.
Richard: That's right.
Kevin: Oh, my gosh.
Richard: It's about the friction.
And they'll hide that.
They'll make that go away.
Thank you, James.
James: Thank you.
Richard: And over here is where they'll lose the ductwork for the baby's room right here.
Again in the corner of the bookcase, there's the vertical.
If you look, here's those joist bays.
They'll be able to run that horizontal all the way to that corner.
Kevin: And then Charlie buttons it up, and you hardly know it's there, and it's a good compromise to get good airflow.
Richard: That's right.
And they'll be done with all this rough-in today.
Kevin: Nice.
♪♪ ♪♪ ♪♪ Hey, Charlie.
Charlie: Hey, Kevin.
Kevin: So it's HVAC day.
We're working with Richard and James.
We're doing duct work downstairs.
They've got an air handler in the basement, and I'm told another one is up here.
Charlie: Actually, you walked right under the scuttle hole to get up there.
Kevin: Oh, boy.
I see an uninsulated roof.
Charlie: HVAC system lives up there.
2x6 rough framing, no insulation.
Kevin: So that thing must be working like crazy.
It gets so hot up there in an attic.
Charlie: Richard went up there with a thermometer, and it was 120 degrees and climbing.
Kevin: Insane.
Charlie: But remember, wintertime, in the reverse.
It's freezing up there.
Kevin: Yeah.
Charlie: So that's working overtime... Kevin: All year.
Charlie: ...all year.
Kevin: So at some point, they turned us into finished space.
This is why we got all the walls up.
But they also added HVAC... Charlie: That's right.
Kevin: ...and didn't put insulation up there?
Charlie: I know.
It's crazy, right?
But, I mean, they insulated above the ceiling... Kevin: Right.
Charlie: ...and they continued it right down this roof line here.
Kevin: Okay.
So you're obviously going to fix that for us.
Charlie: We are.
Kevin: So what are you thinking?
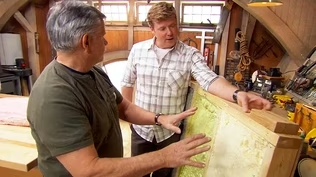
Charlie: So we have a few different samples right here.
So this is a open-cell spray foam, right?
Kevin: So you spray it in, it expands, and you get what from it?
Charlie: So this is about 3, 3.5 per inch for an R-value, but vapor does travel through it.
Kevin: Hence the name open-cell.
Charlie: That's right.
Kevin: Yeah.
Charlie: So we have a closed-cell foam, about double the R-value, so it's at least a seven per inch... Kevin: Yeah.
Charlie: ...and the vapor does not travel through it.
Kevin: Okay.
Yeah.
Charlie: And there's a dense-pack cellulose here which is about three R-value per inch.
Fiberglass is about the same, and that's what we have here above us in the ceiling.
Kevin: Okay.
So that's what we've got in the ceiling.
Nothing on the underside of the roof.
What do you want to do to get your R-value and insulate that?
Charlie: Well, because we have the 5.5-inch old rafters... Kevin: Which isn't much.
Charlie: ...which isn't much, and we have to contend with our energy code, our HERS rating, so we also have to meet that standard.
So I want to use a closed-cell foam starting putting a continuous head of insulation right over the entire HVAC system.
But I don't want to just spray down closed-cell foam to any fiberglass that was in this ceiling.
Kevin: So this is what came out right here, which is actually pretty deep.
So how's that -- Oh, yeah.
Charlie: Yeah.
So whenever they renovated and did work here, they put 2x10s, which was great, and they put the 10 inches of insulation in here.
Kevin: Were you surprised to see that?
Charlie: I was surprised because when I was up in the attic looking down, I couldn't see any sign of this.
So, I mean, they did the right thing.
They threw it down 2x10.
They got extra insulation in here... Kevin: Yeah.
Charlie: ...but once again, they failed up top right.
Kevin: Right.
Charlie: That system is run-- you know, really working overtime.
I said, "We're gonna insulate that properly.
Let's just put a slice through here.
It's one big patch.
We're gonna patch it in once we're done."
But I pulled the fiberglass out.
Now then they spray foam.
They can reach up, spray right down through here, spray right down here.
And then this is a knee wall that we have, but we have access on the other side.
We'll get in behind there, pull any of the fiberglass out and we'll continue that closed-cell foam right down, giving us our insulated hat.
Kevin: So you get a continuous vapor barrier.
You get more R per inch.
We like all of that.
This is gonna help you meet your total score for that energy rating.
Charlie: It's going to help us.
I bet you it puts us over, which is great.
Kevin: Love it.
Let me just challenge you here.
Some people, they just don't like foam.
Charlie: Correct.
Kevin: For whatever reason, they're just like, "I don't want foam in the house," which I get.
Could you get this solved with the alternatives?
Charlie: I could solve it with any of the insulations.
It would definitely be more work to do.
But remember, this is not a gut renovation or, of course, a new house where it makes it easier to insulate with other insulations.
Kevin: Right.
Charlie: In this case, I have to make sure I hit every nook and cranny with a vapor barrier protection, and I couldn't sit there and promise you that.
Kevin: Right.
And if we didn't use this with that really high R rating, you've got to hit that number for the energy code.
Charlie: That's right.
Kevin: If you don't hit it here, or I should say if you don't maximize your insulation here, what happens to that number?
Charlie: Well, a lot of times, let's say I could only do half for whatever the reason is, I might have to overcompensate somewhere else.
Might be they might say, "I want you to change your HVAC system.
That's not quite efficient enough for us, so we're going to force you to change that."
Well, if I insulate, that's not going to work as hard.
So dollar-wise, it's cheaper.
Kevin: So that's the solution.
Alright.
Sounds good.
And, hey, listen, don't sell yourself short.
You've been overcompensating the entire time I've known you.
Charlie: Alright.
It's fair to say.
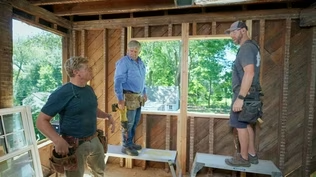
Kevin: [ Chuckles ] ♪♪ ♪♪ ♪♪ ♪♪ Well, the rain has started, but that's not a problem, Tommy, because we're starting to install our new windows so we can get the house weather-tight.
Tom: Right.
Kevin: Uh, process?
Product?
What are we putting in?
Tom: Well, we're installing this new energy-efficient window.
Those are 15 lites over 1 lite, and it's simulated divided lite, which means the divider between each one of these muntins on the inside and outside.
So when you look diagonally at the window, you can't see through the muntins.
Kevin: Okay.
Going into an existing opening where we took out the old windows.
Tom: Right.
Now, under the porch here, this doesn't really need to be flashed like we would do normally, but it's good practice to always do them right.
Now, the siding on the porch is stained.
The rest of the new house has got new siding, so now we have to think about how we flash the window casing when it meets the siding here.
And this wasn't flashed at all.
I can see that there's a house wrap in there.
There's no way that you can stop water from wind-driven rain to get in there when this board expands and contracts this way.
If this joint opens up just the hair or if the rain's really driving, the water will go in there, run down.
It'll actually rot the wall right here.
I've seen it many times.
Rotting wall, rotting sill.
They blame it on the window.
It should be blamed on the flashing.
Kevin: So we got to get a good backer behind casing and the siding right there?
Tom: Right.
And, uh, we got -- we have to basically think about how we're going to do it.
So what I did is I cut a slot behind here, basically cut all the nails in as far as I could so I could take a piece of felt paper like this and slide it in behind this joint, go right up the wall.
So now when my casing goes on, this joint is basically flashed.
Kevin: Okay.
Tom: Alright?
So now if water migrates through there, it's gonna come down, run out here, and onto the siding.
Kevin: Alright.
And then in terms of the opening, um, it looks like it's packed out a little bit.
But then on the bottom right here, you got a clapboard.
Tom: Clapboards work out beautiful 'cause they're thick on the bottom and narrow on the top.
So you take that clapboard, you turn it, lay it down.
You have a natural pitch.
You want that condensation to be able to drip down and come out and run onto the face of this clapboard, not behind the clapboard.
Kevin: So that's our pitch.
What about flashing this part?
Tom: We're going to use a flashing that is stretchable.
So what we want to do is we want to take off some of the backing right here, but just the wide part and leave on the narrow part.
So I'm going to take it, I'm going to peel it back just a little.
Keep it even on the inside.
You know, right down like that.
Get it on there.
Now I can stretch it right around.
Kevin: So I remember the dozens and thousands of times that you've taught me how to cut the old stuff when wasn't stretchy.
Tom: Oh, yeah.
Kevin: Making those little cuts so we can fold it over.
Tom: Yeah, if you flash it right, it's not going to leak.
But this takes the guesswork out of it.
Kevin: There you go.
Tom: Before we put the window in, we're going to run a thin bead right around the opening, across the top and down the two sides just to help air seal it.
And we want to make sure that we use a caulking that doesn't react with the oil that's in the felt paper, because it will cause the felt paper to break down over time.
Alright, so now what we're going to do is check the existing sill to make sure it's level.
So I can't get the level between there, so hold that one like that.
These are our shims.
Put this like this.
We have the thin side sticking out.
Put the level on there right against the opening.
Kevin: Look at you.
Tom: Okay.
Now I'll just tack this in place.
Tack that one.
We don't want the shim to be in the way, so I'm gonna cut it back.
On the interior, we have to think about the bookcases on each side, so we want to make sure that the window is centered into the bookcases.
So we have a center line on our window.
We'll match that up with the center line on the header, and the window will be centered in the opening.
Eyeball the bottom into the center.
Right, now, are you good?
Kevin: Good.
Tom: Let's push it in.
Set it in place.
Alright.
Can I trust you to go inside and line up those two lines?
Kevin: I could do that for you.
Tom: Okay, good.
Kevin: Right there.
Tom: Alright.
I'm going to tack it.
Alright.
Trying to make the window plumb.
Oh, yeah.
Right on the button.
♪♪ If the numbers match, window is square, level, and plumb.
Now we just nail it off using a galvanized roofing nail.
♪♪ So we just put a couple of nails on the bottom.
♪♪ Kevin: Okay, Tommy.
Looks pretty good to my eye.
What do you think?
Tom: I think it looks great.
And I think it's going to look even better when they get the new casing on.
Kevin: Alright, so one in, a couple more to go.
I've got to excuse myself and help Charlie inside, alright?
Tom: Okay.
He's got a good problem in there.
Kevin: [ Chuckles ] "A good problem."
Tom: Good luck with that.
Kevin: So to the right side of the front door, we've got this three-window bay right here, and each one of these openings is gonna get another new window like that.
But as you come inside, we've got another thing going on with this bay, Charlie.
The first time I got here, Liz was showing us how this sort of slopes away from the main floor.
Charlie: Yeah.
So if you just stick this level here and really just hold it flat... see that there?
Kevin: Oh, yeah.
Charlie: It's about a half inch.
Kevin: 100%.
Right.
So, I mean, when you guys pulled up the floor, I saw this line here.
You didn't do this, right?
This was existing?
Charlie: Yeah.
This is the foundation in the house right now, and that's where it falls, and here's the sill sitting on the foundation.
Kevin: Foundation ends here.
Charlie: It ends here.
So they didn't follow this bay.
Some people think that, oh, maybe this was added afterwards.
I don't, 'cause here's our old framing that comes right out.
And I'm sure what they did was they took a couple of big flat rocks like we've seen in the past, and put them under where the two windows in the bay intersect on both sides.
And I'm sure they had posts there and that's how it was stabilized.
Kevin: Okay.
Charlie: But over time, it's settled.
And when this deck was rebuilt years ago, they took out those and stabilized it by putting new concrete footings in and posts.
So this isn't going anywhere.
It is stable where it is.
Kevin: So do we need to jack it or anything?
Charlie: We don't.
So, what I think we're gonna do is just continue pulling out all the boards, and then we're gonna shim as needed on each existing floor joist right down to zero.
Perfect.
This ledge here is extending our floor joists, and it's at the same height as the old one was.
Kevin: So this way if we add this, we're not gonna have the new floorboards just hanging over there on nothing?
Charlie: That's right.
Kevin: So, Charlie, even though we padded out this rim joist right here, that's not the finished height, right?
Charlie: No, that's the old height against the existing rim joists or outside floor joists.
Kevin: Okay, so how are we getting the new height?
Charlie: So this is a piece of the subfloor that we're gonna use, which is an actual thickness of 3/4 inch.
Our existing boards are 7/8.
So we're already off 1/8.
Kevin: Okay.
Charlie: So we're gonna take our sample piece and put it on the one we just screwed onto the outside edge.
You're going to take the six-foot level and use it as a straight edge.
And then I'll take a measurement from the top of our subfloor to the underside of the level, and that'll be what the measurement is on the left side.
And then we'll check it on the right side and see if it's the same.
Kevin: So if they're the same, we have a flat shim.
If they're different, we've got a slightly tapered shim.
Charlie: That's right.
Looks like we have a strong 1/4.
Let's check the right side.
Looks like we have about 3/4.
Kevin: So we're going from a 1/4 to 3/4 over four feet.
Charlie: That's right.
That looks like it's perfect.
Kevin: And we'll do it for each one of these?
Charlie: That's right.
And each one is different.
♪♪ ♪♪ That's good.
♪♪ Kevin: Okay.
Charlie: Perfect.
Kevin: So... Ooh.
Charlie: So we do have to still glue this down and nail it, but it's a perfect dry fit, and it works.
Kevin: Yes.
And, uh, it is not a drop here at all.
Charlie: No.
And we'll spray the closed-cell foam to the underside of the subfloor.
It'll be very warm.
Kevin: Beautiful.
Alright.
Sounds like a plan.
So, until next time, I'm Kevin O'Connor... Charlie: And I'm Charlie Silva.
Kevin: ...for "This Old House" here in Needham, Massachusetts.
Kevin: Next time on "This Old House"... Charlie: Installing window trim can be tedious, but I have a way that's gonna save us a lot of time.
Man: We've cut these boards out, so now every part are cut to the exact size that are required.
Charlie: As straight as an arrow.
Heath: Then I'll show you how to lay out the electrical for a new kitchen, whether you're doing a renovation or a new build.
Jenn: And by removing just one plant, we've transformed the front yard.
♪♪


- Home and How To

Hit the road in a classic car for a tour through Great Britain with two antiques experts.


Support for PBS provided by:
Funding for THIS OLD HOUSE is provided by The Home Depot and Renewal By Andersen.